

If you’ve ever filmed a great video, only to be disappointed by how blurry or low-quality it looks on screen, you’re not alone. Whether it’s a cherished family clip, a tutorial shot on your phone, or a product video for social media, bad resolution can ruin everything.
CapCut, already popular for its intuitive editing features, now offers a powerful AI Video Upscaler that sharpens, clears, and enhances video quality in just a few clicks. You don’t need to understand advanced editing techniques or invest in expensive gear. All you need is CapCut on your PC, and you’re ready to transform ordinary videos into polished content that stands out. Let’s explore why beginners are raving about this tool and how you can start using it today.

Why AI Upscaling in CapCut is a Game-Changer for Beginners
1. No Technical Skills Required
Traditional video editors often require a steep learning curve. Some paid tools offer professional-level control, but beginners usually find them confusing. CapCut flips the script. With Enhance Quality, you don’t have to fiddle with manual filters, sharpness settings, or contrast tweaks. The AI does the work for you. In case you want to include a voiceover later on, you can even make use of the AI voice generator to have a smooth and clear narration. This makes your video look more polished.
2. Improves Old, Blurry, or Pixelated Footage
Maybe you recorded your video years ago on an older phone. You may have downloaded a clip from a platform that compressed the quality. Instead of discarding that footage, CapCut’s upscaling tool can restore it to a clearer, more vibrant version.
3. Perfect for Social Media and YouTube Content
Viewers expect HD content on platforms like TikTok, Instagram Reels, and YouTube. A crisp video builds trust and keeps people watching longer. With CapCut’s AI video enhancer, even beginners can create professional-looking content that holds attention.
4. One-Click Enhancement
Beginners love tools that simplify their workflow. With CapCut, you upload your video, choose the Enhance Quality option, and let the AI do the rest. It analyzes your footage frame by frame and automatically boosts the resolution and clarity.
How Beginners Can Use CapCut Desktop’s AI Video Upscaler Tool
If you’re ready to improve your video quality in minutes, here’s how to do it using CapCut’s Desktop Video Editor:
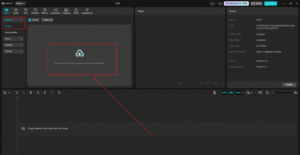
Step 1: Download CapCut for Desktop and Import Your Video
Head to the CapCut official website and download the CapCut Desktop Video Editor. Once installed, open CapCut Desktop Video Editor and click “New Project”. Import the video you want to upscale by dragging it into the media library or using the “Import” button. CapCut supports various formats, so whether it’s an old vlog, mobile recording, or screen capture, it’ll likely work without conversion.
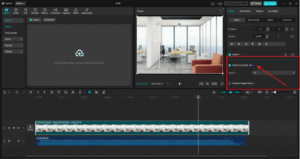
Step 2: Use the Enhance Quality Tool
After importing, drag your video onto the timeline. Check the toolbar or right-hand panel for the “Enhance quality” option, click to apply the Enhance Quality effect. You’ll notice that the AI begins to enhance the video quality. Depending on your video length and computer specs, processing can take a few minutes, but the result is worth it. Use Text to Speech AI to add narration to your video; with the use of this tool, your video will gain more reach.
Step 3: Export the Enhanced Video
Once the upscaling is done, preview your video to ensure it looks sharper and cleaner. If satisfied, click “Export”. Choose your resolution (ensure it matches the upscale you selected). Set your file name and location. Hit “Export” again to save your final video. Now you have a high-resolution version of your clip—perfect for uploading or sharing!

Tips to Get the Best Results from CapCut Video Upscaler
-
Begin with the highest-quality original footage available. While the AI tool is powerful, it works best when it has decent input to build from.
-
Don’t upscale beyond what you need. For example, if you’re posting on Instagram, 1080p is usually enough.
-
Combine CapCut features like text-to-speech, filters, or auto-captions with other tools to make your videos even more engaging.
-
Use the split screen to compare the original and enhanced video while editing. This helps you appreciate the difference CapCut’s AI makes in real-time.
Real-Life Use Cases: Where Beginners Shine
Family Memories and Vlogs
People use CapCut’s upscaling tool to rescue low-res videos of weddings, birthdays, and travel adventures. AI helps preserve these moments in modern, clean formats.
Online Teachers and Educators
Recorded a screen capture in 720p? Upscale it, and your students won’t have to squint. It adds professionalism and polish to e-learning videos.
Small Business Product Videos
DIY product demo videos or customer testimonials can look sharper with AI upscaling, helping boost trust and engagement on platforms like TikTok or Etsy.
Final Thoughts
CapCut proves that you don’t need to be a professional video editor to create high-quality content. Its Enhance Quality Tool levels the playing field by giving beginners access to the same sharp, stunning video quality once reserved for pros with high-end gear.
In just three simple steps: steps—import, upscale, and export—you can turn your average clips into eye-catching content worthy of your feed or channel. If you’re looking for a way to breathe new life into your videos without spending hours editing, CapCut’s AI Video Upscaler is the tool to try.