A messy background can kill an otherwise perfect image in a single scroll. That stray chair, a cluttered bookshelf, or a mismatched poster steals attention and dilutes your message. Background cleanups let you keep the original moment while removing distractions, turning casual shots into polished, brand-ready visuals. Pair that workflow with quick motion previews from an AI clip maker and you can test how the cleaned image performs as a still, a cinemagraph, or a short promo before you publish. Pippit brings these edits together so small teams and solo creators can tidy, test, and post without the reshoot drama.

This guide is practical and playful. I will walk you through why background edits matter, simple shoot habits that make cleanups easier, micro-edit techniques that sell realism, a few tidy templates for common social formats, and how to scale edits across a content calendar. Expect concrete examples you can try today and a short Pippit routine at the end.
Why the background is the first unseen critic
People read images before they read captions. The human eye seeks faces and edges, then scans the rest of the frame for context. If the context is noisy or ambiguous, the brain treats the whole image as lower quality. Cleaning backgrounds reduces cognitive friction: viewers understand the subject faster and linger longer. That extra attention is the currency of social platforms.
Beyond attention, background edits protect brand perception. A tidy backdrop signals professionalism and care. For small businesses, that perception can mean higher trust, more clicks, and better conversion rates. For creators, it means a more cohesive grid that tells a consistent story.

Shoot with cleanup in mind
Some shots are harder to rescue than others. Planning a few minutes on set saves hours in the editor. Start by choosing neutral base shots: plain walls, even lighting, and simple props. These give your background tool the cleanest mask to work with.
When you cannot control the environment, capture extra frames. Slight changes in pose, two or three shifts in angle, and a couple of close-ups create options. If you intend to animate the image into a short clip later, record a short 3–6 second loop so you can add parallax or motion without a reshoot.
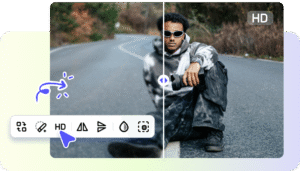
The believable swap: micro-techniques that sell realism
Background swaps fail when they look pasted. Believability lives in micro-details. Match light direction first. If the natural light on your subject comes from the right, the new background should reflect that. Match color temperature next. A warm, sunlit scene does not pair naturally with cool fluorescent light on the subject.
Anchor the subject with a subtle ground shadow or reflection. This single move stops the floating-sticker look. Match texture and grain across layers so the final image feels unified. When the backdrop has filmic grain or mild noise, apply a similar treatment to the subject layer.
Use local adjustments rather than global sliders. Preserve natural skin tones and accurate product colors. Small, selective edits keep authenticity while cleaning the scene.
Simple and effective steps to enhance photos with Pippit
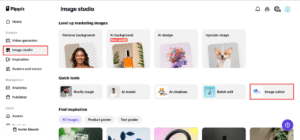
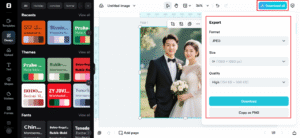
Step 1: Insert your images
First, register for the Pippit image resolution enhancer, go to Image Studio from the left menu, and select Upscale Image. Select Device to upload your image. Alternatively, go to Image Editor, upload your photo, and select Image Upscaler under Smart Tools to allow AI to upscale the image.
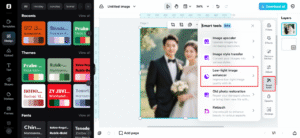
Step 2: Upscale and edit your images
Next, use Retouch to enhance the subject’s face, Effects to incorporate colors into the image, or Low-Light Image Enhancer to correct the darkness and gloominess. You can also apply text overlayer, stickers and shapes, collages, and texture and detail adjustment to your images.
Step 3: Save your images
Click on Download All at the top right-hand side of the Pippit enhancer photo. Define the size and format, then click on Download to save the photo to your computer and apply them in your projects.
Quick templates that speed social publishing
Here are a few ready-to-use approaches that work across industries.
-
Product hero: neutral studio backdrop with a branded accent color for CTAs.
-
Founder portrait: soft office blur that reads professional but personal.
-
Lifestyle moment: curated environmental scene (cafe, patio, park) with subtle depth of field.
These templates help you move from messy to curated without overthinking each post.
Edit for the crop: thumbnails and aspect ratios
Most people see thumbnails first. A background that reads well at full size might collapse into noise when cropped to 1:1 or 9:16. Always preview your cleaned image in the exact sizes where it will appear. Tighten compositions for thumbnails by increasing negative space around the subject and moving key elements away from the edges where UI overlays live.
When converting images into short reels or vertical promos, timing matters. Trim reveals and animate subtle motion with Pippit’s online video cutter so transitions feel natural and the cleaned background does not flicker or reveal artifacts.

Balancing authenticity and polish
Audiences value authenticity, but they also reward clarity. Background cleanups should remove distraction, not erase context that matters. If your local setup tells an important story — a workshop bench for makers, a kitchen counter for food brands — preserve those cues. When you remove background elements that tie the image to a real moment, replace them with equally meaningful context so the post retains narrative honesty.
Low-budget fixes that avoid reshoots
Here are efficient tricks that rescue common problems without restaging.
-
Tighter crop: remove messy edges and focus on the subject.
-
Depth blur: simulate shallow depth to hide clutter and emphasize foreground.
-
Minimal overlay: add a gradient or blurred strip where text will sit so copy is legible.
-
Partial swap: replace only the distracting zone instead of the whole background.
These moves are fast and often invisible to the audience.
Scaling cleanups across a content calendar
For ongoing content, build a small backdrop library: a few neutral textures, a set of branded color plates, and several environmental scenes that align with seasonal campaigns. Tag these assets with moods (cozy, premium, energetic) so your team can pick quickly. Batch-edit sessions using consistent presets speed production and keep your feed cohesive.
Small motion, big impact
Static cleanups are great, but motion can amplify the effect. A tiny parallax on a cleaned background or a 3–4 second cinemagraph draws the eye more than a still image. When you animate, keep edits minimal — a nudged shadow, a slow camera push, or a gentle vignette shift. Use an ai clip maker to prototype how a cleaned photo behaves when animated and then finalize timing with an online video cutter so cuts land on emotional beats.
If you prefer cost-free tools for baseline cleanup before final polish, a free image enhancer online can speed the first pass and let you focus detailed manual work where it matters most.
Before you hit publish: a quick checklist
Before posting, run a short checklist. View the image at thumbnail size, check skin tones, confirm text contrast, preview any added motion, and test alt text. If the image will be used as an advertisement, preview it using platform UI overlays to ensure that no important details are obscured.
Closing edge: tidy images, better results
Background cleanups are the unsung productivity hack of social teams. They save time, cut costs, and make every shot a reusable asset. With a few shoot habits and a tidy toolkit like Pippit, you can transform messy, real-life moments into consistent, brand-ready content that performs. Clean the background, keep the story, and publish with confidence.
Ready to tidy your feed? Open Pippit, upload a few imperfect shots, and see how a small cleanup changes everything.